If you have a truly excellent memory, you may recall when Pierce made a pyramid from Legos for Social Studies in second grade. Cort and Reid have reached that point in their studies. Both of them were eager to start their pyramid project. The only guideline was that it had to have a square base and four sides. I think they each wanted to do something unique.
Reid decided to work with Sculpey clay. He created a little scene with two pyramids, including lots of pots and treasure. He even made the Nile river. We baked it in the oven and then after it cooled he painted it with acrylic paints. On the base piece he painted Elmers glue and then sprinkled sand from his sand box over it. He spent a long Saturday creating his scene to perfection.
Cort is really into rocks and gems, so he decided to build his pyramid from cardboard and then hot glue "gems" to it. He also glued a layer of bright patterned paper before putting on the gems (which I got from the dollar store). He made a pyramid that really POPS.
They were both really pleased with the results, and couldn't wait to present them in school.
Readers, how would you make a pyramid?
Showing posts with label crafts. Show all posts
Tuesday, March 7, 2017
Monday, March 30, 2015
Little Red Hen House Craft from Tissue Boxes
Once in a while I like to take old tissue boxes and make some sort of craft with the kids. If you've been following my blog for a while, you've seen us create rocket ships, fairy houses, and castles from old tissue boxes. This year, to get ready for Easter, we made a little red hen house.
After you get the boxes all taped together, cut a piece of cardboard for the roof. The Pepsi box worked well, because it already had a natural bend in the cardboard. Trim it to size, then cover with the red duct tape.
Using craft glue, secure the roof to the body of the hen house. Let sit for several hours to adhere well.
Fill with Easter grass (or hay, as we did) and Easter eggs. Have fun!
Readers, do you have any Easter egg hunts in your near future?
You will need: 3 (or more) square shaped tissue boxes, additional cardboard (we used a Pepsi box), scissors, red duct tape, and craft glue.
Trim the top of the tissue boxes to make the openings larger. Line up the tissue boxes and then tape them together using red duct tape (we found ours at Walmart, for just under $4).
After you get the boxes all taped together, cut a piece of cardboard for the roof. The Pepsi box worked well, because it already had a natural bend in the cardboard. Trim it to size, then cover with the red duct tape.
Using craft glue, secure the roof to the body of the hen house. Let sit for several hours to adhere well.
Fill with Easter grass (or hay, as we did) and Easter eggs. Have fun!
Readers, do you have any Easter egg hunts in your near future?
Wednesday, December 10, 2014
Elf on the Shelf Holiday Decorating Craft with #Idelight #Holidaydelight
Our Elf on the Shelf is named Tulley, and he has been with us for five years now. He isn't sneaky and naughty like some of the elves. He comes around Thanksgiving and most nights moves from place to place, but he doesn't tend to play any pranks. One year he did give our beta fish a Christmas statue.
This year the boys and I decided to create a home for Tulley to come to. My husband has been drinking tons of the International Delight creamer, especially with all the fun new seasonal creamer flavors, so I thought I would try to repurpose one of their coffee creamer containers.
First I washed it out and let it dry. Once it was clean, I peeled off the label and then cut an opening just the right size for an elf. I used a knife to make the initial cut in the bottle, and then switched to scissors so that I would have more control on the curves. I used a spray paint white primer to prime the bottle. Priming is an important step, because otherwise when you add color it would run or be uneven.
I allowed the primer to dry, and then used a brick red craft paint to coat the whole bottle. It took two coats to get a nice even effect. Then I used an off-white and a small brush to paint the bricks by hand.
Once this is done, you can personalize your bottle. You could make a sign with your elf's name on it, or paint a little Christmas tree. We decided to put a wreath about the opening on ours.
We set out our new home and it only took a few days for it to bring Tulley back to our house. We were thrilled to see him again! And he seems to be happy to have his own place.
For more fun holiday crafts and recipes, check out the International Delight community. If you join, you will also have access to awesome giveaways and coupons.
Readers, have you done any crafts for the holidays yet?
This is a sponsored conversation written by me on behalf of International Delight. The opinions and text are all mine.
This year the boys and I decided to create a home for Tulley to come to. My husband has been drinking tons of the International Delight creamer, especially with all the fun new seasonal creamer flavors, so I thought I would try to repurpose one of their coffee creamer containers.
First I washed it out and let it dry. Once it was clean, I peeled off the label and then cut an opening just the right size for an elf. I used a knife to make the initial cut in the bottle, and then switched to scissors so that I would have more control on the curves. I used a spray paint white primer to prime the bottle. Priming is an important step, because otherwise when you add color it would run or be uneven.
I allowed the primer to dry, and then used a brick red craft paint to coat the whole bottle. It took two coats to get a nice even effect. Then I used an off-white and a small brush to paint the bricks by hand.
Once this is done, you can personalize your bottle. You could make a sign with your elf's name on it, or paint a little Christmas tree. We decided to put a wreath about the opening on ours.
We set out our new home and it only took a few days for it to bring Tulley back to our house. We were thrilled to see him again! And he seems to be happy to have his own place.
For more fun holiday crafts and recipes, check out the International Delight community. If you join, you will also have access to awesome giveaways and coupons.
Readers, have you done any crafts for the holidays yet?
This is a sponsored conversation written by me on behalf of International Delight. The opinions and text are all mine.
Thursday, April 17, 2014
Cute Snow Globe Craft
In March the twins had an Art Night at their preschool. We were so impressed with all the fun crafts and art they have been making throughout the year. I thought I'd share my favorite.
They used clear plastic dessert plates for the globe part, and glued stock paper to the back. The inside has a picture of them cut out to look like they are jumping in the snow. There is also a lot of glitter on the inside. They're even cuter in person than in picture!
That said - I hope this artwork is the only snow around our house until next December!
They used clear plastic dessert plates for the globe part, and glued stock paper to the back. The inside has a picture of them cut out to look like they are jumping in the snow. There is also a lot of glitter on the inside. They're even cuter in person than in picture!
That said - I hope this artwork is the only snow around our house until next December!
Tuesday, October 22, 2013
A Craft Fair Bust
I promised to give a recap of the craft fair I attended two weekends ago, and unfortunately it was sort of a bust. The fair was outside, and it rained all.day.long. We were under a deck, but my soaps collected the moisture and mist in the air and got gooey. And although the booth fee was fairly high, the people who put it on did not do a good job of advertising. The 40+ vendors there were all rather disappointed that there wasn't much traffic.
That said, I learned a lot which was good. And I had good company all day - my mom came with me and sold some of her knitting.
My mom brought with her Irene. Irene is her model. She did a great job, as the sweater and one of the scarves she was wearing both sold.
I sold a couple of painted birdhouse gourds, a couple of pencil cases, some soaps, a lot of peanut butter fudge, and some bookmarks. It wasn't a total loss. I am going to give it another try. I've signed up for another one in early November. And this time? It's INDOORS.
That said, I learned a lot which was good. And I had good company all day - my mom came with me and sold some of her knitting.
My mom brought with her Irene. Irene is her model. She did a great job, as the sweater and one of the scarves she was wearing both sold.
I sold a couple of painted birdhouse gourds, a couple of pencil cases, some soaps, a lot of peanut butter fudge, and some bookmarks. It wasn't a total loss. I am going to give it another try. I've signed up for another one in early November. And this time? It's INDOORS.
Thursday, September 19, 2013
Upcycled Pringles Gift Container Craft
The boys recently had a special playdate, and I used a coupon to buy some Pringles to go along with the food we were serving. Afterwards, it seemed wrong to toss all those nice Pringles cans, so I decided to upcycle them into something new. I found a picture on Pinterest where someone had covered them with Christmas wrapping paper to use as gift containers. I modified the idea some, to make it my own, and was pleased with the results. Think about it - how perfect would these be for giving a gift of cookies to a special teacher over the holidays?
All you need is some scrapbooking paper (or heavy duty wrapping paper) and Elmer's glue. I used some scrapbooking paper that I got at a thrift store a few years ago. I was glad to finally have a use for it, since I don't scrapbook. First make a pattern for the size of the can, and then cut out your paper.
Pour some Elmer's glue into a small dish and paint it on the back of the paper. You slowly roll your paper onto the can, smoothing as you go to prevent wrinkles. Leave a slight overlap at the end, and then put some masking tape on it until the can has dried well. You can also make matching gift tags to go on top.
For the owl can, I actually spray painted it, but made an owl out of the scrapbooking paper. I glued it on the same way, using masking tape for the edges overnight until everything had dried. I used vintage buttons that my grandmother gave me for the eyes.
I was having so much fun, that when I ran out of Pringles cans, I also did a Laughing Cow cheese box. I'm the world's worst gift wrapper, so I'm excited to have found an easier (and cuter!) method.
Readers, do you have any special ways you like to wrap gifts?
All you need is some scrapbooking paper (or heavy duty wrapping paper) and Elmer's glue. I used some scrapbooking paper that I got at a thrift store a few years ago. I was glad to finally have a use for it, since I don't scrapbook. First make a pattern for the size of the can, and then cut out your paper.
Pour some Elmer's glue into a small dish and paint it on the back of the paper. You slowly roll your paper onto the can, smoothing as you go to prevent wrinkles. Leave a slight overlap at the end, and then put some masking tape on it until the can has dried well. You can also make matching gift tags to go on top.
For the owl can, I actually spray painted it, but made an owl out of the scrapbooking paper. I glued it on the same way, using masking tape for the edges overnight until everything had dried. I used vintage buttons that my grandmother gave me for the eyes.
I was having so much fun, that when I ran out of Pringles cans, I also did a Laughing Cow cheese box. I'm the world's worst gift wrapper, so I'm excited to have found an easier (and cuter!) method.
Readers, do you have any special ways you like to wrap gifts?
Thursday, September 12, 2013
Signazon Review and #Giveaway
Recently I've been thinking of having a booth at a local craft fair with some of the items I've been making in my spare time...homemade soaps, tooth fairy pillows, gnomes, painted birdhouse gourds, and pencil cases. I've never been a vendor at a craft fair before, and the whole idea of this foreign experience makes me a little anxious. I want my booth to be as professional as possible, so I decided to order a trade show banner from Signazon. Their banners are quite affordable, starting at $29.88.
I never designed anything like this before, but I knew I wanted to keep it simple. I used a photo I took of Pierce's hands when we were hiking late last Spring. I did the lettering in a forest green, to match my business cards. I will probably use either a dark brown or a forest green tablecloth. When the sign arrived in the mail, I LOVED it. It's much larger than I expected, and is made from a durable vinyl. It has grommets in each corner which can be used to hang the sign in a variety of places. And it rolls up small for easy storage and carrying.
Do you know what Pierce said, when I showed it to him, and told him those were his hands in the picture? He said, "But Mom? I don't remember my hands ever being THAT big!"
In addition to a large variety of signs, Signazon carries car magnets and window graphics. I found their design process very easy to maneuver - even at my beginner skill level. I am going to feel so much more confident going into the craft fair, knowing that my table is going to look just as nice if not better than the booths to each side of it! Wish me luck, readers, as I hope to earn enough money to fund this year's Christmas shopping.
Signazon is generously offering one lucky reader a $50 gift code to use on an item of the winner's choice on their website. Click on the Rafflecopter below to enter.
Disclaimer: I received the pictured banner for review purposes. The opinions above are my own.
a Rafflecopter giveaway
I never designed anything like this before, but I knew I wanted to keep it simple. I used a photo I took of Pierce's hands when we were hiking late last Spring. I did the lettering in a forest green, to match my business cards. I will probably use either a dark brown or a forest green tablecloth. When the sign arrived in the mail, I LOVED it. It's much larger than I expected, and is made from a durable vinyl. It has grommets in each corner which can be used to hang the sign in a variety of places. And it rolls up small for easy storage and carrying.
In addition to a large variety of signs, Signazon carries car magnets and window graphics. I found their design process very easy to maneuver - even at my beginner skill level. I am going to feel so much more confident going into the craft fair, knowing that my table is going to look just as nice if not better than the booths to each side of it! Wish me luck, readers, as I hope to earn enough money to fund this year's Christmas shopping.
Signazon is generously offering one lucky reader a $50 gift code to use on an item of the winner's choice on their website. Click on the Rafflecopter below to enter.
Disclaimer: I received the pictured banner for review purposes. The opinions above are my own.
a Rafflecopter giveaway
Wednesday, September 11, 2013
My Super Trendy Thumb Piercing
The twins outgrew their cute 'thankful' Thanksgiving t-shirts, and I had it in mind that I could try to make them shirts myself. I bought some plain brown long sleeved shirts and cut out material to sew some crazy turkey faces on them. All was going well until I started actually sewing the material on. I had bought an adhesive that was too sticky, and it was giving my sewing machine fits. I had just finished sterilizing cleaning off the machine needle to remove any residue in hopes it would sew better, when somehow (I have no idea how on earth I managed to do this) I sewed through my thumb. The needle went straight in the top and out. I sat there, stunned, looking at my pierced thumb. How was I going to get myself out of this mess? I turned off the machine, the manually lifted the needle up and slowly pulled down on my thumb to remove the needle. Whew, boy, did that ever hurt.
Looking at my thumb, I waited for it to bleed or something, but oddly it never really did. It throbbed and was swollen for a couple of days, but overall healed up quite nicely. Too bad thumb piercings aren't in right now. I suppose I could buy a ring for it and start a new trend.
I had to take a little break from sewing turkey shirts to regroup. But I did, eventually, finish what I set out to do. I think the twins will look mighty cute this November, don't you?
Readers, am I the only one acting like a turkey lately, or has anyone else done something a little stupid recently?
Looking at my thumb, I waited for it to bleed or something, but oddly it never really did. It throbbed and was swollen for a couple of days, but overall healed up quite nicely. Too bad thumb piercings aren't in right now. I suppose I could buy a ring for it and start a new trend.
I had to take a little break from sewing turkey shirts to regroup. But I did, eventually, finish what I set out to do. I think the twins will look mighty cute this November, don't you?
Readers, am I the only one acting like a turkey lately, or has anyone else done something a little stupid recently?
Wednesday, May 1, 2013
Toy Story Buzz Lightyear Pencil Case Giveaway
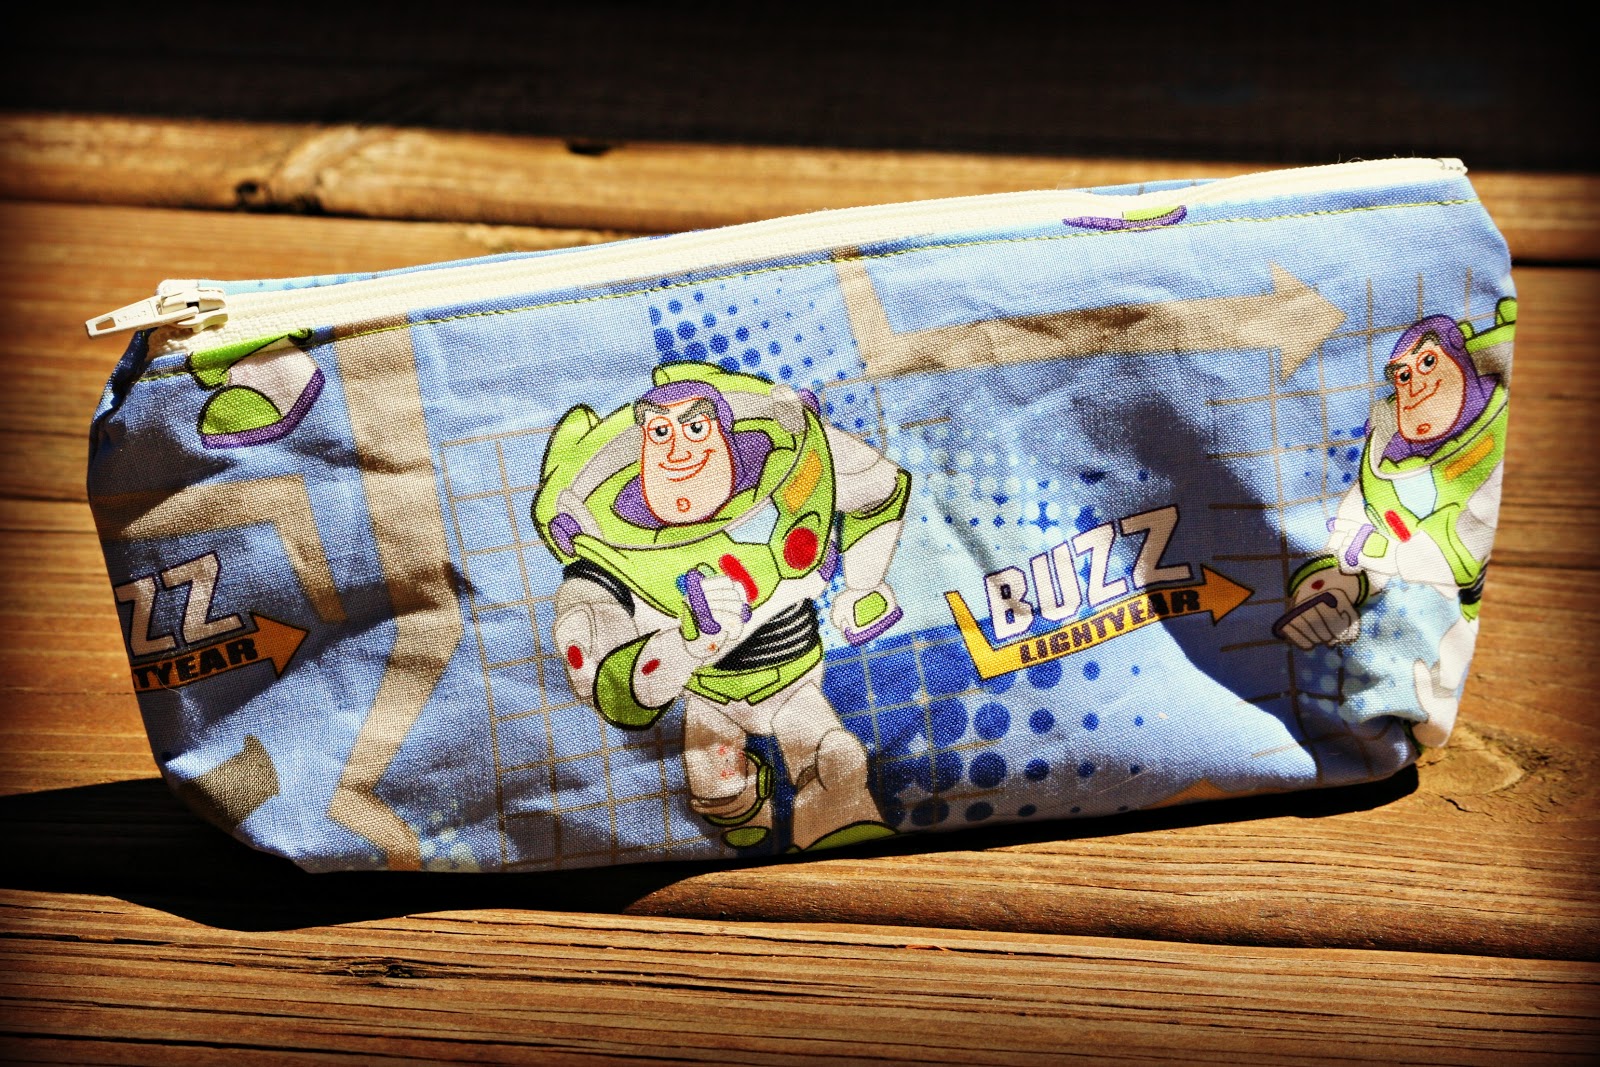
I think it's time for another giveaway! This is yet another goodie I crafted when I had such terrible vertigo. It's a Buzz Lightyear pencil case, and it is stuffed with school supplies.
To enter, just click on the Rafflecopter below:
a Rafflecopter giveaway
Don't want to wait to win it? I have tons of fun pencil cases (Star Wars, Hello Kitty, Brave, John Deere, and many more) available in my Etsy shop, which you can find here.
The back view:
Inside there are school supplies from your favorite Toy Story characters.
To enter, just click on the Rafflecopter below:
a Rafflecopter giveaway
Don't want to wait to win it? I have tons of fun pencil cases (Star Wars, Hello Kitty, Brave, John Deere, and many more) available in my Etsy shop, which you can find here.
Thursday, April 18, 2013
Making a Fairy and Gnome House from a Tissue Box - Craft Tutorial
It's that time of year again! Time for the Tissue Box Challenge with JDaniel4sMom, just in time for Earth Day. She was sweet enough to ask me to be one of the judges this year, so I won't be participating in the contest, but I still wanted to make something because the boys love our tissue box creations (like last year's rocket ship).
I made some gnomes and fairies back when I had vertigo, and I thought it would be fun to create an earthy house for them. I hope that gnomes and fairies can coexist and don't get into fights.
I started by cutting up a small tissue box to add to a large tissue box, using duct tape.
Then I went for a walk in the woods and gathered moss, acorns, sticks, ferns, and forest flowers. With a little craft glue, it was easy to create an earth dwelling for my magical creatures:
I made little chairs and a table from sticks and bark. Acorn shells make perfect little bowls. And Paul helped me drill a hole in a thick stick to make a vase for the forest wildflowers. See the flower fairy on top? I thought she turned out cute.
Reid is always my most enthusiastic child when it comes to tissue box crafts. He can never wait for the glue to dry before he starts playing.
Want to take on this creative challenge? Just click on the button on my sidebar - it lasts until April 22nd. All you have to do is make a fun kid craft from a tissue box, blog about it, and link up. There are fun prizes as well.
Readers, do you think that gnomes and fairies can get along, or do they need separate habitats?
I made some gnomes and fairies back when I had vertigo, and I thought it would be fun to create an earthy house for them. I hope that gnomes and fairies can coexist and don't get into fights.
I started by cutting up a small tissue box to add to a large tissue box, using duct tape.
Then I went for a walk in the woods and gathered moss, acorns, sticks, ferns, and forest flowers. With a little craft glue, it was easy to create an earth dwelling for my magical creatures:
I made little chairs and a table from sticks and bark. Acorn shells make perfect little bowls. And Paul helped me drill a hole in a thick stick to make a vase for the forest wildflowers. See the flower fairy on top? I thought she turned out cute.
Reid is always my most enthusiastic child when it comes to tissue box crafts. He can never wait for the glue to dry before he starts playing.
Want to take on this creative challenge? Just click on the button on my sidebar - it lasts until April 22nd. All you have to do is make a fun kid craft from a tissue box, blog about it, and link up. There are fun prizes as well.
Readers, do you think that gnomes and fairies can get along, or do they need separate habitats?
Wednesday, March 13, 2013
Spring Frog Pencil Case with Goodies Giveaway
At some point in the midst of my vertigo attack, I got into sewing pencil cases. This is interesting because I had tossed my sewing machine into a closet in a fit of anger well over a year ago, swearing to never let it see the light of day again. Apparently, the machine learned it's lesson, because it has been behaving for me on the massive pencil bag production.
I made quite a few pencil case bags in different materials. Or they could be makeup bags. I picked this frog one for my giveaway because it seemed appropriate for an Easter basket - a nice non-candy item! I'm including some Easter pencils and erasers inside.
Want a chance to win this cute bag with pencils and erasers? Just click on the Rafflecopter giveaway to enter. Good luck!
a Rafflecopter giveaway
I made quite a few pencil case bags in different materials. Or they could be makeup bags. I picked this frog one for my giveaway because it seemed appropriate for an Easter basket - a nice non-candy item! I'm including some Easter pencils and erasers inside.
The inside lining is done in pink.
Want a chance to win this cute bag with pencils and erasers? Just click on the Rafflecopter giveaway to enter. Good luck!
a Rafflecopter giveaway
Monday, March 4, 2013
Leaping Leprechauns - Giveaway
As my world turns, I continue with the crafting. I sure do miss running. I've never had vertigo last so long. Incredibly frustrating. I was surprised to hear that so many of you have experienced vertigo as well. I definitely wouldn't wish it on anyone.
So with St. Patrick's Day just around the corner, I have crafted a set of little leprechauns.
Cute, aren't they? Kind of look like they could get up to some mischief in your house though. If you're willing to take the risk of having this duo in your home, click on the Rafflecopter - maybe you could be LUCKY enough to win them!
a Rafflecopter giveaway
Pattern for these, if you'd like to make your own, can be found at Wee Folk Art.
So with St. Patrick's Day just around the corner, I have crafted a set of little leprechauns.
Cute, aren't they? Kind of look like they could get up to some mischief in your house though. If you're willing to take the risk of having this duo in your home, click on the Rafflecopter - maybe you could be LUCKY enough to win them!
a Rafflecopter giveaway
Pattern for these, if you'd like to make your own, can be found at Wee Folk Art.
Monday, February 25, 2013
Sweet Felt Owls - Giveaway
Do any of you have vertigo? I haven't had an attack in years, but I got my balance knocked out from under me about 10 days ago, and I'm still waiting to "sober up". The doctor did call in some medication, but for some reason I'm not responding to it. In the meantime, I can't do my usual activities (including working out/running - sob!). Alternatives include anything that doesn't involve turning my head. At all. So suddenly, I've found myself sitting very still and crafting in my spare time.
My crafty and talented blogging friend Tree posted a link on FB to a tutorial for making felt owls recently, and felt crafts are one of the few I am sort of capable of doing. Granted, I can't do a straight stitch to save my life, but I generally get the project done and it mostly of resembles what it is supposed to be.
I had fun making these felt owls, and plan to do some more. The wooden pegs are tricky to find, and I had to place an order online from a craft store in Maine. The ones I found at JoAnn were okay, but I think they'd be even better with the appropriate size pegs.
If you'd like to be entered to win this sweet set of felt owls (pine tree not included), just enter through the Rafflecopter below. Or, if you'd like to try your hand at crafting your own, you can find the peg owl tutorial here.
a Rafflecopter giveaway
My crafty and talented blogging friend Tree posted a link on FB to a tutorial for making felt owls recently, and felt crafts are one of the few I am sort of capable of doing. Granted, I can't do a straight stitch to save my life, but I generally get the project done and it mostly of resembles what it is supposed to be.
I had fun making these felt owls, and plan to do some more. The wooden pegs are tricky to find, and I had to place an order online from a craft store in Maine. The ones I found at JoAnn were okay, but I think they'd be even better with the appropriate size pegs.
Why Mr. Owl, is that a mouse running across the grass below?
If you'd like to be entered to win this sweet set of felt owls (pine tree not included), just enter through the Rafflecopter below. Or, if you'd like to try your hand at crafting your own, you can find the peg owl tutorial here.
a Rafflecopter giveaway
Wednesday, January 30, 2013
I Love You Because...Valentines Day Craft for Kids
If you've been following my blog for a while, you know I love to make crafts for the boys out of old tissue boxes. And duct tape. Whatever would I do without duct tape? We just use so many tissue boxes through the year, and I hate to throw them away. They certainly come in handy at craft time!
I wanted to make something for the boys to show appreciation to other family members building up to Valentines Day. So I came up with the idea of crafting a mailbox, and leaving some blank Valentines that the boys could fill out over the next couple of weeks. The twins, of course, are not writing yet so they'll need a little extra help with theirs. Paul and I will be participating too. I can't wait to open them up on Valentines Day and read about the little reasons we love each other. Already, this is a huge hit with Pierce, who has been sneakily writing little valentines and placing them in the box. He is so excited to read them when it is time. Maybe this will even become a yearly tradition!
This post is linked with Valentines Traditions over at JDaniel4sMom. Readers, do you send any Valentines?
I wanted to make something for the boys to show appreciation to other family members building up to Valentines Day. So I came up with the idea of crafting a mailbox, and leaving some blank Valentines that the boys could fill out over the next couple of weeks. The twins, of course, are not writing yet so they'll need a little extra help with theirs. Paul and I will be participating too. I can't wait to open them up on Valentines Day and read about the little reasons we love each other. Already, this is a huge hit with Pierce, who has been sneakily writing little valentines and placing them in the box. He is so excited to read them when it is time. Maybe this will even become a yearly tradition!
This post is linked with Valentines Traditions over at JDaniel4sMom. Readers, do you send any Valentines?
Friday, January 11, 2013
Making a Castle from Old Tissue Boxes
I confess I have a bit of a fascination for all things medieval. I usually read a couple of books each year set during that time. So it's no surprise, really, that I'm always hoping to get the boys to play knights and castles. The boys received some knights and dragons for Christmas, but we were missing a castle. So I decided we would build one, out of craft supplies we had around the house.
I used purple duct tape to join together 3 tissue boxes - one long box and two smaller boxes. I thought briefly about spray painting the ensemble, but then decided we could have a purple castle.
I made flags from toilet paper tubes and foam sheets, and also made a moat complete with frog and fish stickers from foam. Then I cut doors and windows.
Here is the back view - the knights can go in the doors in the back of the castle and peek through the windows. The boys are enjoying the addition to their knight and dragon collection. Maybe next we'll creat a dragon's lair to hide our dragons in. After castle creation was complete, we read a few books to help with our creative play.
How about you, readers? Do you remember reading books as a kid and then reenacting them in play?
This post linked with Read, Explore, Learn at JDaniel4sMom.
I used purple duct tape to join together 3 tissue boxes - one long box and two smaller boxes. I thought briefly about spray painting the ensemble, but then decided we could have a purple castle.
I made flags from toilet paper tubes and foam sheets, and also made a moat complete with frog and fish stickers from foam. Then I cut doors and windows.
Here is the back view - the knights can go in the doors in the back of the castle and peek through the windows. The boys are enjoying the addition to their knight and dragon collection. Maybe next we'll creat a dragon's lair to hide our dragons in. After castle creation was complete, we read a few books to help with our creative play.
How about you, readers? Do you remember reading books as a kid and then reenacting them in play?
This post linked with Read, Explore, Learn at JDaniel4sMom.
Thursday, November 15, 2012
Snowman Birdhouse Gourd Tutorial - Rural Thursday
If you remember, I did a lot of complaining last summer about how none of my veggies in the garden were surviving the squash bugs except the birdhouse gourds (which have a sort of stinky odor when they are growing, so it's no wonder the squash bugs ignored them). Well, my gourds have dried out and it was finally time to do something with them. I studied the shape and thought. And it seemed that it would be the perfect shape for a snowman.
I used a mini Playdoh container to trace the birdhouse door, and carved it with a knife. Then I shook out the seeds.
I took the gourd outside and applied several coats of white primer, waiting for each coat to dry in between.
Then I used some small wooden pieces I found in my craft drawer and painted them to make buttons, eyes, and a carrot nose. I found some plaid fleece material and cut it into a scarf. I broke twigs off the pine tree outside for arms. My final step was to screw in an eye hook. I used hot glue to secure it for hanging.
I thought it turned out adorably! Maybe those birdhouse gourds aren't so useless after all. I am hoping to make a few more to use as gifts during the holiday season. I do need to figure out a varnish to protect the paint, since they will be outside in the elements.
It's Rural Thursday! Time to link up with Nancy from A Rural Journal and myself with your stories and pictures of the rural life. Copy the code beneath the button and paste it into your blog post. Then come back and add your post to the linky below. Please make sure you visit the blogs of at least 5 other participants, and leave them a comment. Also, next week due to Thanksgiving, we will not be hosting a link up for Rural Thursday. So we'll see you again on November 29th!
What about you, readers? Have you started any holiday themed crafts this year?
I used a mini Playdoh container to trace the birdhouse door, and carved it with a knife. Then I shook out the seeds.
I took the gourd outside and applied several coats of white primer, waiting for each coat to dry in between.
Then I used some small wooden pieces I found in my craft drawer and painted them to make buttons, eyes, and a carrot nose. I found some plaid fleece material and cut it into a scarf. I broke twigs off the pine tree outside for arms. My final step was to screw in an eye hook. I used hot glue to secure it for hanging.
I thought it turned out adorably! Maybe those birdhouse gourds aren't so useless after all. I am hoping to make a few more to use as gifts during the holiday season. I do need to figure out a varnish to protect the paint, since they will be outside in the elements.
It's Rural Thursday! Time to link up with Nancy from A Rural Journal and myself with your stories and pictures of the rural life. Copy the code beneath the button and paste it into your blog post. Then come back and add your post to the linky below. Please make sure you visit the blogs of at least 5 other participants, and leave them a comment. Also, next week due to Thanksgiving, we will not be hosting a link up for Rural Thursday. So we'll see you again on November 29th!
What about you, readers? Have you started any holiday themed crafts this year?
Saturday, May 26, 2012
Using Floam to Make a Pencil Cup for Father's Day
Would you believe that way back in the early 90s, when Floam first came out, I bought some? I was in high school, and thought it was cool stuff. Today's formula is new and improved, so when I was contacted about using Nickelodeon's Floam to create a pencil cup craft for Father's Day, I was pretty excited to revisit the substance. The pencil cup you see in this picture is made with Floam, but it was not made by us - it was sent for inspiration!
Pierce tests out the pencil up they sent with a pencil! I dug into the recycling bin and found an old vinegar bottle to use for our pencil cup - it was just the right size. I cut off the top and taped around the top edge before passing it over to Pierce.
Pierce was particularly fascinated with the consistency of Floam. He kept asking how it was made - how they got all those tiny white balls in there. While Floam is soft and pliable (plus nontoxic and washable), if you let it sit out it will eventually dry and harden.
Following the instructions we were sent, Pierce rolled out the Floam into a sheet long enough to wrap around our bottle. He needed help for the actual wrapping process.
We decided letters might be a little too tricky (and I did want this to be as much a Pierce-creation as possible). So Pierce said he wanted to make a smiley-face heart and a sun instead of "#1 Dad".
I did help him with the shape of the heart (using scissors to cut it out once the blue was rolled out). I also helped him get the circle of the sun. And I assisted him a bit with the piece on top - that was most difficult part for him. I think it turned out cute, how about you? Next up Pierce says he's going to make a Floam monster.
You can also find Floam on Facebook and Twitter. So readers, if you had some Floam right now, what would you create?
Disclaimer: I received the products pictured on top in exchange for writing a review. The opinions you have read are all my own.
Pierce tests out the pencil up they sent with a pencil! I dug into the recycling bin and found an old vinegar bottle to use for our pencil cup - it was just the right size. I cut off the top and taped around the top edge before passing it over to Pierce.
Pierce was particularly fascinated with the consistency of Floam. He kept asking how it was made - how they got all those tiny white balls in there. While Floam is soft and pliable (plus nontoxic and washable), if you let it sit out it will eventually dry and harden.
Following the instructions we were sent, Pierce rolled out the Floam into a sheet long enough to wrap around our bottle. He needed help for the actual wrapping process.
We decided letters might be a little too tricky (and I did want this to be as much a Pierce-creation as possible). So Pierce said he wanted to make a smiley-face heart and a sun instead of "#1 Dad".
I did help him with the shape of the heart (using scissors to cut it out once the blue was rolled out). I also helped him get the circle of the sun. And I assisted him a bit with the piece on top - that was most difficult part for him. I think it turned out cute, how about you? Next up Pierce says he's going to make a Floam monster.
You can also find Floam on Facebook and Twitter. So readers, if you had some Floam right now, what would you create?
Disclaimer: I received the products pictured on top in exchange for writing a review. The opinions you have read are all my own.
Monday, April 16, 2012
Space Rocket Ship Craft from Tissue Boxes for Earth Day - Tissue Box Challenge!
Every year I get pretty excited about trying to do some crafts out of supplies that would normally go in the recycling bin. So for this year's Earth Day Tissue Box Challenge, I've been saving Kleenex boxes for ages. In fact, I feel kind of guilty as to how many we've amassed in the past year - do we really use that many tissues?! I wanted to use as many as I could in a craft, to clear some space in my hall closet. Since Pierce's biggest passion right now are all things space, we decided to create a rocket ship.
First, we glued together the tissue boxes. I also cut off the end of a 2 liter soda bottle and glued/taped it on the top to make the nose of the space ship. Pierce helped with all the glueing.
Then I took it out in the yard to paint it. Pierce cut out the letters I drew on red foam and glued them on the rocket.
The best part of this craft? All your little friends can take a ride in the rocket ship! The boys had fun filling it with some of their favorite stuffed animals.
It took all 3 boys to get it launched, but finally we saw it zooming across our living room and headed towards space!
This has been a fun craft for the boys and they've certainly enjoyed playing with it over the past couple of weeks!
Now is your chance to link up to the Annual Tissue Box Challenge for a chance to win fun prizes. First, grab the code for the button and paste it into your blog post.

Then come back and add your blog post all about the cool craft you've created with your kids to the linky:
Please be sure to visit the blogs of at least 3 other participants and leave them some comment love about their crafts! Prizes include a $20 Amazon gift card for first place and a craft kit to make 2 monsters from plastic bags for second place:
Judging will be done by Red Ted Art. Have fun!
First, we glued together the tissue boxes. I also cut off the end of a 2 liter soda bottle and glued/taped it on the top to make the nose of the space ship. Pierce helped with all the glueing.
Then I took it out in the yard to paint it. Pierce cut out the letters I drew on red foam and glued them on the rocket.
The best part of this craft? All your little friends can take a ride in the rocket ship! The boys had fun filling it with some of their favorite stuffed animals.
It took all 3 boys to get it launched, but finally we saw it zooming across our living room and headed towards space!
This has been a fun craft for the boys and they've certainly enjoyed playing with it over the past couple of weeks!
Now is your chance to link up to the Annual Tissue Box Challenge for a chance to win fun prizes. First, grab the code for the button and paste it into your blog post.

<div align="center"><a href="http://www.twobearsfarm.com/" title="Two Bears Farm"><img src="http://i796.photobucket.com/albums/yy247/jdaniel4smom/TissueBoxChallenge2012.jpg" alt="Two Bears Farm" style="border:none;" /></a></div>
Then come back and add your blog post all about the cool craft you've created with your kids to the linky:
Please be sure to visit the blogs of at least 3 other participants and leave them some comment love about their crafts! Prizes include a $20 Amazon gift card for first place and a craft kit to make 2 monsters from plastic bags for second place:
Judging will be done by Red Ted Art. Have fun!
Subscribe to:
Posts (Atom)